
E ' facile , molto facile .
§ How can you do paint tubes ?
It's easy , very easy.

- 2 cesoie, 1 grande ed 1 piccola a becco piatto.
- 1 tubo di alluminio da 3 mm di diametro
- etichette adesive
- pennarelli
- perline o cilindretti di Fimo.
§ You'll need :
- 2 shears , 1 bigger and 1 smaller with a flat cut
- 1 alluminium tube 3 mm diameter
- self adhesive labels
- felt pens
- beads, Fimo cilinders

Non vogliamo solo tagliarlo, vogliamo anche dargli forma.
§ Cut the tube with the bigger shear with smal rotatory motions.
We don't want only to cut it,we want to shape it as well.

§ This is what you will get.

§ Separate the bit and don't look at my nails :o(

§ Now cut it of the desired length with the flat shear, I usual keep them 9 mm long.

§ Here is your tube but it still lacks of something.
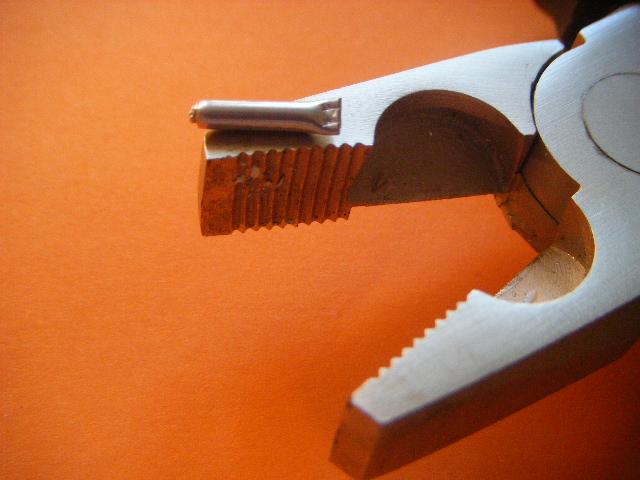
§ Squeeze it at the bottom with the serrated part of your tong , you'll have the closure.

§ Cut thin stripes of adhesive paper and colour them as you wish.

§ Roll it around the tube.

Io di solito uso la plastica termorestringente ma non trovo più i miei tappi di riserva :o/
§ Glue a bead or a small Fimo slice.
I normaly use shrinkable plastic ( the type you cook in oven ) but now I cannot find my spare caps :o/

§ Do as many as you want , build up a nice box and have fun :o)))
§ Cliccate sulle foto per ingrandirle
§ Click on the pics to make them bigger
davvero molto facile, grazie!
RispondiEliminabaci, Caterina
Rosanna, Thanks a lot for this tutorial. I will try by all means.
RispondiElimina¡Fantástico, Rosanna! Muchìsimas gracias por explicarlo, me va a venir muy bien para idea que tengo para la buhardilla :-)
RispondiEliminaUn beso
Thank you for the tutorual. They look so real. Just perfect for an artists studio.
RispondiEliminaThank`s for sharing. I will send this to my sister, she will have a art room in her house.
RispondiEliminaMona
Thank you for this wonderful and very clear tutorial.
RispondiEliminaMi ero sempre chiesta come poterle fare, quindi grazie mille per il suggerimento.
RispondiEliminaCiao Faby
Thank you very much for the great tutorial.
RispondiEliminaHugs Maria
great tutorial instructions easy to follow, will be trying this out
RispondiEliminadebs x
Great tutorial, Rosanna! =)
RispondiEliminaThey look like a lot of fun to make....!
RispondiEliminaWonderful tutorial!! Will have to keep this in mind for the future! hugs, ara
RispondiEliminaOggi sono un po' triste e il tuo tuotorial mi appare ancora più naif e rassicurante...
RispondiEliminaGrazie :-)
Un abbraccio, Flora
P.S. Le tue unghie sono molto carine :-)
Fabulous tutorial Rosanna, thank you SO much. This is something that's been on my mind for a while in the 'I wonder how I could make..." department and you've supplied the answer. xx
RispondiEliminaGrazie per il tutorial, no pensavo fossero così facili da fare....
RispondiEliminaCi proverò...
Angelina
A fun tutorial Rosanna, thanks!
RispondiEliminaGreat tutorial, Rosanna! Thanks a lot, I should try it.
RispondiEliminaGreat tutorial Rosanna. Thank you for sharing..x
RispondiEliminaDavvero facile! La trovo un'idea geniale!
RispondiEliminaFantastico tutorial Rosanna!! Dovresti brevettarlo ;o)) Grazie per averlo condiviso. Baci
RispondiEliminagracias por compartirlo, es un tutorial genial y parece facil de hacer , beso
RispondiEliminaOoooo, such a lovely tutorial Rosanna!
RispondiEliminaThank you for sharing this :)
Thank you for sharing my dear...it is much easier then the way I did it...
RispondiEliminaSabihax
Great!!!!
RispondiEliminaThank you very much for this fantastic tutorial - what a clever idea!
RispondiEliminaGreetings
Birgit
P.S.: Thank you for your last and very kind comment on my blog... let me guess, translating German to English wasn't any better than German to Italian... (LOL). I really appreciate you trying to follow my very long posts... ;O)
Ahhh.... Thank you Rosanna! I have wondered how people make those Tiny paints! Someday... when I get to the Studio building part of one of my dollhouses..... maybe sooner than I thought with this inspiration urging me to TRY it!...... I will know what to do! As you know.... I LOVE to paint and REALLY am looking forward to doing a Mini Studio Someday!
RispondiEliminaI really enjoyed the tutorial. Thanks for sharing!
RispondiEliminaHugs
Hellllo genius! Stupendous tutorial, lovely nails. You manicure your own ? :)
RispondiEliminaI love the tutorial because you explain the steps ever so clearly and paint tubes, sooner or later, we all want them. Thank you, dearie!
Thank you Rosanna. This is a wondeful tutorial. Hugs from Craftland
RispondiEliminaWow...what a great tutorial Rosanna... Thanks a lot for sharing :0)
RispondiEliminaThank you for this lovely tutorial, Rosanna! Wow! What a fantastic result! I love your box of paint tubes! :-)
RispondiEliminaOh Rosanna I absolutely love these tiny tubes of paint! I have never seen such things in my life, tiny tubes of paint (big tubes yes indeed, but not miniatures). You are so very clever because they look so real! I had to look twice, and read the tutorial to see they were miniatures!
RispondiElimina